User:Tarcii Asmara/Temp USS Victory Deck Listings: Difference between revisions
Jump to navigation
Jump to search


Ashley Roy (talk | contribs) m (Ashley Roy moved page Temp USS Victory Deck Listings to User:Tarcii Asmara/Temp USS Victory Deck Listings without leaving a redirect: sandboxes need to be in userspaces) |
|||
| (16 intermediate revisions by one other user not shown) | |||
| Line 1: | Line 1: | ||
{{Victory}} | [[File:Layout_small2.jpg|left|700px]] {{Victory}} | ||
| Line 8: | Line 19: | ||
==Deck 01== | ==Deck 01== | ||
[[File:Deck01v.jpg|left|300px]] | |||
*[[Intrepid Bridge|Main bridge]] | *[[Intrepid Bridge|Main bridge]] | ||
*[[Intrepid Ready Room|Captain's Ready Room]] | *[[Intrepid Ready Room|Captain's Ready Room]] | ||
| Line 20: | Line 26: | ||
*Secure Locker (Weapons Access) | *Secure Locker (Weapons Access) | ||
*Aft Airlock & Subsystems | *Aft Airlock & Subsystems | ||
==Deck 02== | ==Deck 02== | ||
[[File:Deck02v.jpg|left|300px]] | |||
*[[Intrepid Mess Hall|Officer's Mess (Refuge 1)]] | *[[Intrepid Mess Hall|Officer's Mess (Refuge 1)]] | ||
*[[Intrepid_XO_Office | XO´s Office]] | *[[Intrepid_XO_Office | XO´s Office]] | ||
| Line 39: | Line 40: | ||
*Escape Pod Access (4) | *Escape Pod Access (4) | ||
*Emergency Life Support (Decks 1, 2) | *Emergency Life Support (Decks 1, 2) | ||
==Deck 03== | ==Deck 03== | ||
[[File:Deck03v.jpg|left|300px]] | |||
*[[Victory Captain's Quarters|Captain's Quarters]] | *[[Victory Captain's Quarters|Captain's Quarters]] | ||
*Senior Officers' Quarters (8) | *Senior Officers' Quarters (8) | ||
| Line 57: | Line 53: | ||
*Aft. Airlock & Subsystems (Upper Hull Access) | *Aft. Airlock & Subsystems (Upper Hull Access) | ||
*Deflector Screen / Force field Generator Control | *Deflector Screen / Force field Generator Control | ||
==Deck 04== | ==Deck 04== | ||
| Line 68: | Line 63: | ||
*Senior Officer's Quarters (2) | *Senior Officer's Quarters (2) | ||
** Lieutenant Commander [[Sharpe, Paul|Paul Sharpe]] quarters. | ** Lieutenant Commander [[Sharpe, Paul|Paul Sharpe]] quarters. | ||
** Lieutenant [[Stoyer,_Cory|Cory Stoyer]] quarters. | |||
*Officer's Quarters (10) | *Officer's Quarters (10) | ||
** [[Sevo,_Ayiana|Ayiana Sevo's]] Quarters | ** [[Sevo,_Ayiana|Ayiana Sevo's]] Quarters | ||
**CWO3 [[Bjarnadottir,_Petra|Petra Bjarnadottir]] (PNPC) | |||
*6-Personnel Transporter Rooms (2) | *6-Personnel Transporter Rooms (2) | ||
*Dorsal Phaser Maintenance | *Dorsal Phaser Maintenance | ||
| Line 201: | Line 198: | ||
|} | |} | ||
==Deck | ==Deck 09B== | ||
{| border='0' cellspacin='0' style="width: 80%; height = 200px;" | {| border='0' cellspacin='0' style="width: 80%; height = 200px;" | ||
! style="width:20%; text-align: left;" | | ! style="width:20%; text-align: left;" | | ||
| Line 229: | Line 226: | ||
*Forward Torpedo Launch Bays 1 & 2 | *Forward Torpedo Launch Bays 1 & 2 | ||
*Spare Warp Core Storage Well (Upper Section) | *Spare Warp Core Storage Well (Upper Section) | ||
*[[ | *[[Victory_SOS_Lab|Sensor Operations Stations Lab – SOS Lab]] | ||
*Stellar Cartography Lab | *Stellar Cartography Lab | ||
*Emergency Life Support (Decks 9B, 10) | *Emergency Life Support (Decks 9B, 10) | ||
*Primary Computer | *Primary Computer Bay (Upper Section) | ||
*Enlisted Mess & Lounge (Refuge 2) | *Enlisted Mess & Lounge (Refuge 2) | ||
*Petty Officer Mess & Lounge (Refuge 3 ) | *Petty Officer Mess & Lounge (Refuge 3 ) | ||
| Line 238: | Line 235: | ||
==Deck 11== | ==Deck 11== | ||
{| border='0' cellspacin='0' style="width: 80%; height = 200px;" | |||
! style="width:20%; text-align: left;" | | |||
! style="width:80%; text-align: left;" | | |||
|- valign="top" | |||
| [[File:Deck11v.jpg|right|300px]] | |||
| | |||
*Cargo Bay - Main Level | *Cargo Bay - Main Level | ||
*[[Intrepid Engineering|Main Engineering Bay | *[[Intrepid Engineering|Main Engineering Bay (Main Level)]] | ||
* | *Primary Deflector Generator Bay (Upper Section) | ||
*Aft Observation | *Chief Engineer's Office | ||
*Aft Observation Louge (Shuttle Pilot Ready Room) | |||
*Spare Warp Core Storage Well (Mid Section) | |||
*Primary Computer Bay (Mid Section) | |||
*Emergency Life Support (Decks 11, 12) | |||
*Shuttle Parking Bay | |||
*Cryogenic Fluid Storage (Upper Section) | |||
*Warp Nacelles & Bussard Collectors | |||
|} | |||
==Deck 12== | ==Deck 12== | ||
{| border='0' cellspacin='0' style="width: 80%; height = 200px;" | |||
! style="width:20%; text-align: left;" | | |||
! style="width:80%; text-align: left;" | | |||
|- valign="top" | |||
| [[File:Deck12v.jpg|right|300px]] | |||
| | |||
*Primary Deflector Generator Bay (Middle Section) | |||
*Environmental Systems Control Room | |||
*Antimatter Containment Bay | |||
*Primary Computer Bay (Main Section) | |||
*Primary Deflector Generator Bay (Middle Level) | |||
*Cryogenic Fluid Storage (Main Level) | |||
*Cryogenic Cooling Systems Control Room | |||
*Engineering Substation | |||
*Navigational Systems Control Room | |||
*Warp Plasma Distribution Engineering Bay | *Warp Plasma Distribution Engineering Bay | ||
|} | |||
==Deck 13== | ==Deck 13== | ||
{| border='0' cellspacin='0' style="width: 80%; height = 200px;" | |||
* | ! style="width:20%; text-align: left;" | | ||
*Diagnostics & Repair Engineering Workshop/Lab | ! style="width:80%; text-align: left;" | | ||
* | |- valign="top" | ||
* | | [[File:Deck13v.jpg|right|300px]] | ||
* | | | ||
*Warp Core Coolant Compartment & Subsystems | |||
*Science Labs 13 & 14 | |||
*Science Labs Special Supplies/Storage 1 & 2 | |||
*Diagnostics & Repair Engineering Workshop/Lab 1 & 2 | |||
*Emergency Transporter Room 2 | |||
*Intelligence Suite | |||
*Marine Detachment | |||
*Main Deflector Generator Bay (Main Level) | |||
|} | |||
==Deck 14== | ==Deck 14== | ||
{| border='0' cellspacin='0' style="width: 80%; height = 200px;" | |||
! style="width:20%; text-align: left;" | | |||
* | ! style="width:80%; text-align: left;" | | ||
*Diagnostics & Repair Engineering Workshop/Lab ( | |- valign="top" | ||
* | | [[File:Deck14v.jpg|right|300px]] | ||
| | |||
*Antimatter Processing | |||
*Diagnostics & Repair Engineering Workshop/Lab 3 & 4 | |||
*Offices (4) | |||
*Deflector Screen / Force field Generator Control Room | |||
*Damage Control Command | |||
*6-Personnel Transporter Rooms 3 & 4 | |||
*Escape Pod Access (4) | |||
*Access to Landing Strut Ladder (4) | *Access to Landing Strut Ladder (4) | ||
* | *Antimatter Injector Bay Access | ||
*Emergency Life Support (Decks 13, 14, 15) | |||
|} | |||
==Deck 15== | ==Deck 15== | ||
{| border='0' cellspacin='0' style="width: 80%; height = 200px;" | |||
! style="width:20%; text-align: left;" | | |||
! style="width:80%; text-align: left;" | | |||
|- valign="top" | |||
| [[File:Deck15v.jpg|right|300px]] | |||
| | |||
*Antimatter Generator Bay | |||
*Plasma Relay Control Room | |||
*Primary Warp Core Ejection Hatch | |||
*Reserve Warp Core Storage (Lower Section) & Ejection Hatch | |||
*Battery Room Control | |||
*Transporter Buffer Compartment | |||
|} | |||
==Deck 16== | |||
*Landing Struts / Pad Bay (4) | *Landing Struts / Pad Bay (4) | ||
*Escape Pod Access (10) | *Escape Pod Access (10) | ||
[[Category:USS Victory|* ]] | [[Category:USS Victory|* ]] | ||
Latest revision as of 15:36, 19 May 2015

| USS Victory | ||
|---|---|---|
 NPC STATUS VESSEL | ||
| ||

Escape pod access is available on all decks.
Important Note: The features listed are not an exhaustive account of all facilities/components installed.
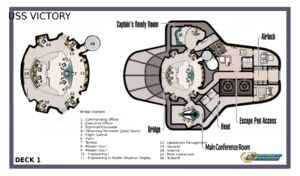
Deck 01

- Main bridge
- Captain's Ready Room
- Main Conference Room
- Escape Pod Access (2)
- Secure Locker (Weapons Access)
- Aft Airlock & Subsystems
Deck 02

- Officer's Mess (Refuge 1)
- XO´s Office
- Captain's Dining Room
- VIP Quarters (2)
- Dorsal-Forward Observation Lounge (2)
- Subspace Transceiver
- Battery Compartment
- Aft Tactical Sensor Subsystems Suite
- Escape Pod Access (4)
- Emergency Life Support (Decks 1, 2)
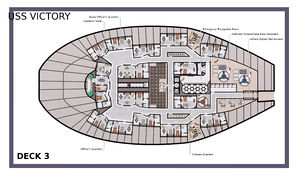
Deck 03

- Captain's Quarters
- Senior Officers' Quarters (8)
- Officer's Quarters (2)
- Enlisted Quarters (2)
- VIP Quarters (2)
- Equipment Storage
- Emergency Transporter Room
- Aft. Airlock & Subsystems (Upper Hull Access)
- Deflector Screen / Force field Generator Control
Deck 04
 |
|
Deck 05
 |
|
Deck 06
 |
|
Deck 07
 |
|
Deck 08
 |
|
Deck 09A
 |
|
Deck 09B
 |
|
Deck 10
 |
|
Deck 11
 |
|
Deck 12
 |
|
Deck 13
 |
|
Deck 14
 |
|
Deck 15
 |
|
Deck 16
- Landing Struts / Pad Bay (4)
- Escape Pod Access (10)