WordPress websites: Creating posts
| Web Development Team |
|---|
|
Creating posts on WordPress is quite easy. Please take a read through the information below, for more information.
Important: The Visual Editor
WordPress provides a powerful tool for use when creating posts and pages, called the "Visual Editor." When you click on the "Write" link, on the Dashboard, you'll be presented with some boxes to fill in, the first being "Title," and the second being "Post." You'll notice that there are some gray buttons which look a lot like something you'd see in Microsoft Word. These buttons constitute the "Visual Editor," which basically means that you don't have to worry about HTML - the editor formats the code for you behind the scenes, allowing you to preview what the text will actually look like.
However, there is a caveat to using this visual editor. In trying to help you avoid any code at all, it will keep any formatting you copy and paste into it. This means, if you create a post in Microsoft Word, and use the "Comic Sans" font, and then copy your text into this visual editor, the editor will keep the "Comic Sans" font, and that font will then show up on the actual post itself.
This is bad, because we want our blog to appear uniform in nature, and not have a variety of differently sized, formatted, and colored fonts. We want one font to rule them all, if you will.
So, to avoid a painfully ugly situation, we have to use one simple step. You only have to follow this procedure if you're copying text from another program. If you write your text directly into the WordPress editor, you don't have to worry about this.
If you are copying and pasting text from another program, you must FIRST paste that text into a program called "Microsoft Notepad." (If you're using Apple, you need to use whatever "Notepad" equivalent is provided in your operating system.) You can find this program in two ways:
- Click on the "Start" button in Microsoft Windows, click the "Run" option, and in the box, type "Notepad" and press enter. Notepad will pop open.
- Click on the "Start" button in Microsoft Windows, click "All Programs" then "Accessories." You should see Notepad there. If you don't, follow the instruction above with #1.
Once the program is open, paste your text into the program. Now deselect all the text. Then select all the text (CTRL + A), and copy the text (CTRL + C). Now you can then paste the text into WordPress. You'll notice that any formatting is gone, and you're left with clean, plain text. Use the provided editing buttons, in WordPress, to re-add any formatting.
Creating and editing posts
You may wish to view a short video, published by WordPress, to find out more about how creating/editing posts works. Click the link below to see that video.
After viewing the post, you should have a preliminary understanding of how creating posts works. Now, to head-off a few questions, let's just go over the fields you will want to make sure are completed, before publishing your post:
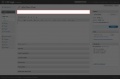
Title box: This is the box at the top of the page.
Body box: This is the big box in the middle of the page.
Excerpt options: This should be below the body box. You'll need to click on the gray bar that says "Excerpt" to get it to open up.
Tag options: This is to the right of the body box.
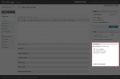
Category options: This is to the right of the excerpt bar, and under the tags box.

Publish: The publishing options are near the upper right-hand corner of the box.

Publish later: The publishing options are near the upper right-hand corner of the box.
Preview post: The publishing options are near the upper right-hand corner of the box.


We'll now discuss some of the lesser self-evident sections.
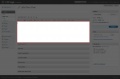
Excerpt
If you're creating a very long post, you may want to use the "Excerpt" option, as it will keep the front page of the site more manageable.
Each post you create will have a section on the front page of the site. And each time a new post is created, it "pushes down" the older posts. So, if you post something that is many pages long, it will push the older stories way down the page. An excerpt simply puts a few lines on the front page of the site, and gives the reader the option of reading more, if they're interested.
To use the excerpt option, simply click on the "Excerpt" bar below the body box, and then put the first few lines of your story into the box.
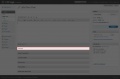
Tags
Tags make finding an article easier. An article can have as many tags as necessary. Simply type some "key words" into the box. For example, for a mission summary where your crew meets up with a Vulcan ambassador, you might enter "mission summary vulcan ambassador diplomacy".
Categories
Categories are very important, because they help organize content. Simply choose the category that most represents your post. If there isn't an appropriate category, save the post as a "draft" and talk to your Captain about creating a category for your needs.
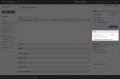
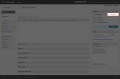
Publish options
There are a few options regarding publishing your post.
- Publish: The publish option allows the post to be seen on the main page of the site. If you are set as a "Contributor" to the site, your post will enter a moderation queue so that an Editor can review it. If you're an "Editor" on the site, your post will be published immediately.
- Publish immediately / publish later: This might be a little hard to find, so use the image posted above to see it. This option allows you to set a later date for your post to appear on the site.
- Preview post: This option simply allows you to see how the post will look once it's on the site.