|
Bridge Crew Guide
Here, we've compiled tips for each bridge station!
Helm
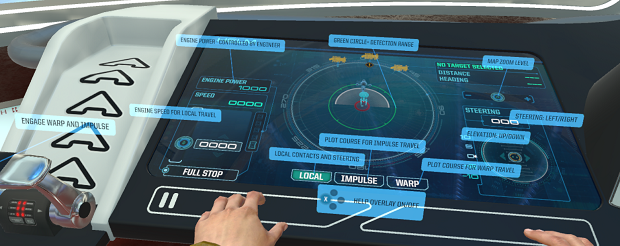
- Forward and reverse direction is controlled only by the throttle. Moving the steering "joystick" forward makes the ship go up. Moving it all the way back makes the ship go down. While Z-axis movement is capped at +60 and -60 above and below the plane, you can move the ship above and below other ships and obstacles such as asteroids.
- While it is tempting to hit that engage button yourself as soon as you're lined up for warp or impulse, best practice is to report ready and aligned to the captain first and wait for the final departure confirmation ("Engage!"). Your captain may decide to belay the order to go to warp or impulse if the situation changes suddenly.
- You might find the exterior view more helpful than the viewscreen at times.
TOS Enterprise
- Speed information can be seen on the display to your left along the upper rim of the bridge.
- The row of lights left of the collision alert in the center of the forward bridge console also indicate your throttle.
- When navigating the warp and impulse maps to set a course, you must hit select for the course to be plotted.
USS Aegis specific
- USS Aegis detection radius doesn't increase if speed kept to 4000 or lower.
- If engineering reroutes all power to engines, USS Aegis top speed increases from 5000 to 7600.
- Certain anomalies also lower detection radius.
Tactical
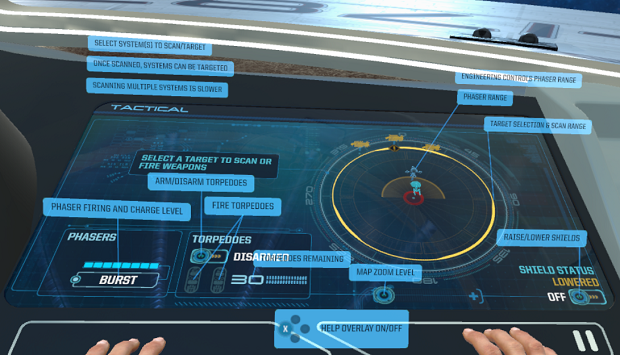
- Shields take a moment to come online after you raise them. Once damaged, shields are on a simple timer of 75 seconds from the first hit before they reset back to 100%. Turning shields back on and off again does not decrease that time.
- Increased phaser power from engineering increases phaser range AND damage on USS Aegis. Increased phaser power on TOS Enterprise and Enterprise-D only increases phaser range.
- Default phaser fire mode is burst. If you target subsystems of an enemy, the fire mode will change to beam.
- You can cut down scan time greatly by deselecting all systems and only checking the one(s) asked for by your captain (e.g., "Scan for lifesigns").
- Transporter cannot get a lock until you complete a scan.
USS Aegis specific
- Lower USS Aegis detection radius by disarming torpedoes and lowering shields.
- Shield disruption again enemy ships only allows direct phaser damage to the hull. Transporters cannot beam through disrupted enemy shields, and torpedoes still hit shields first.
TOS Enterprise
- The TOS Enterprise has an unlimited complement of photon torpedoes.
- Target information and phaser status can be seen on the display to your right along the upper rim of the bridge.
Engineering/Operations
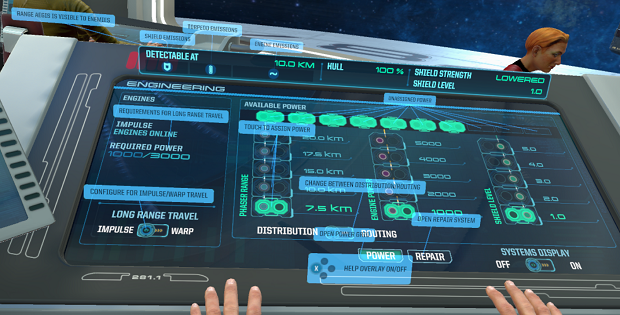
- Systems do not overload when rerouting power on USS Aegis until there are more than 5 nodes in one system.
- Thus, if you reroute level one node from shields to engines and then reroute level five node from engines to shields, you have essentially just exchanged an equal number of nodes and both systems will not overload.
- Rerouting level one and level two nodes from other systems to engines gives 3750 engine power. Thus, you've effectively rerouted systems so that you can deliver almost the same as normal level four engine power at level two, freeing up two additional units of power you can allocate to phasers or shields instead.
- It's usually more effective to concentrate repair teams on one system at a time.
- You cannot repair hull damage.
- Shield power affects durability of the shields, NOT recharge rate. You cannot boost damage shields with more power. Shields are on a simple timer of 75 seconds from the first hit before they reset. Turning shields back on and off again does not decrease that time.
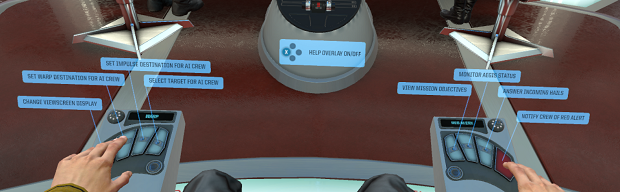
USS Enterprise-D (as Operations)
- On USS Enterprise-D, for maximum tactical capabilities, ensure that at least one team is in torpedoes, phasers (to give tactical precision fire), and shields (to enable shield modulation). Recommended assignment is 3 redshirts to torpedoes (to reduce torpedo load time as much as possible) and one of any other color to phasers and shields.
- There is a bug unfortunately that sometimes happens on the Enterprise-D where the transporter will become inoperable (you won't be able to activate the buttons). The only way to resolve this is to move out of the seat and let the NPC officer take over and execute the transport or if running a full crew of four, drop out temporarily to let the NPC officer perform the transport and then be reinvited back into the session.
- To enable cloak hunt, put a team in scanners.
- To slow hull damage, put a team in the computer core (to boost the ship's structural integrity field).
Captain
- Pay attention to the NPC science and communications officers during missions to get additional information beyond the mission objectives.
- If you do not press the hail button, your coms officer will put it through anyway in most cases.
- When playing with NPCs filling in for certain bridge stations, Red Alert will make NPCs automatically bring the ship to combat readiness. However, you must explicitly tell an NPC tactical officer to arm torpedoes.
- There are multiple endings and variations for both the campaign and ongoing missions, and there is not always one "right" path. The fun of the captain's role is decision making, so don't necessarily just do what the last captain did in a mission you've played before. Pick a tactic or command style you want to try for the mission and stick to it. You might be surprised by how the game responds.
USS Aegis
- Reducing your detection radius is only possible on the Aegis. You cannot lower the detection radius of the TOS Enterprise or Enterprise-D.
Patrol Mission
- My favorite mode: basically you can simulate what it would be like to stand watch on a starship and as you'd expect in a "real life Starfleet," some patrols might be relatively routine, answering a friendly request from a freighter or scanning some anomalies while others may end up being full of combat.
- The game will give you three random locations you can choose from (added benefit: no more helm officers jumping the gun before you've told them where to go), but you are free to go ANYWHERE in the Trench, and random tasks/encounters will spawn regardless. Still, a good plan is to at least head to one of the marked locations first to start.
- Time isn't really an issue. If you want to wrap up the patrol as quickly as possible, just complete the remaining marked encounters. If one encounter takes a particularly long time, your communications officer will say upon completion that you have gathered enough research to head back to base, even if you haven't completed three full encounters or gone to every marked location. If you want to stay longer, you can continue traveling around the Trench to see what other random encounters you might come across and then turn in the mission by heading back to base (unless you get destroyed first).
- There are two kinds of subspace shockwaves. Listen to your NPC science officer to know which one is headed your way and what to do. You can also escape if your helm officer is fast enough by leaving the area, either by warp OR impulse to another part of the system .
- Sometimes another ship will ask you to beam something or someone aboard from them, but your operations officer will not be able to get a lock (the unfortunate bug described earlier under the ops guide). The only way to complete the task is to let the NPC take over ops and perform the transport (either have the ops player move to another open station or drop out temporarily and be reinvited back in).
Borg "Resistance" Mission
- If you are unable to recover one of the prototype components, you are unlikely to succeed on this mission, but it *is* possible. Good luck!
|


